
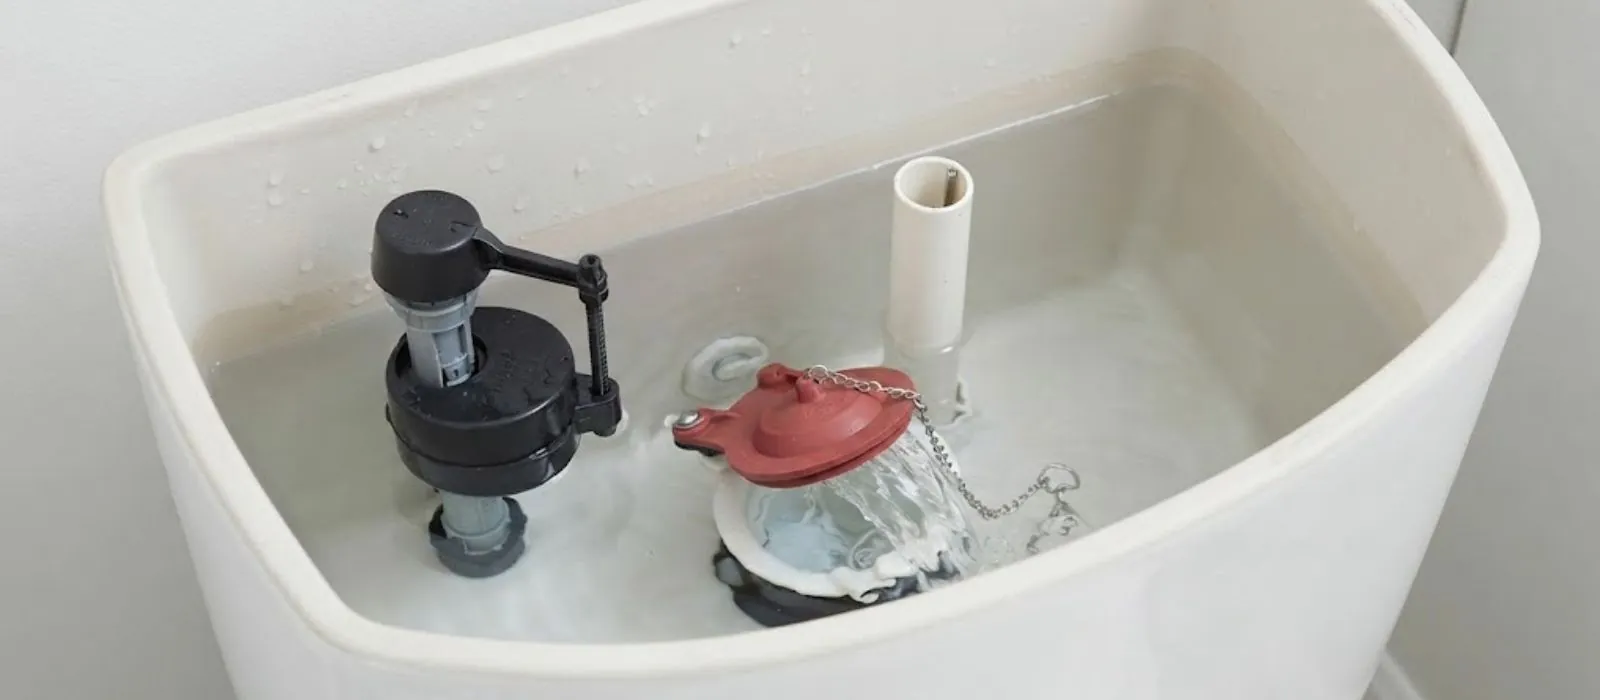
Open the lid and look first
Lift the tank lid and flush. Watch the water level, the flapper at the bottom and the fill valve on the left. Most problems announce themselves in thirty seconds.
If water is running into the bowl after the flush ends, the flapper is not sealing. If the tank refills but will not stop, the fill valve or float is at fault. If the flush is weak, the water level may be too low or the flush valve is partly blocked.
The three parts that fail most
| Part | Symptom | Fix | Skill |
|---|---|---|---|
| Flapper | Toilet runs on, phantom refills | Replace flapper and check chain length | Easy |
| Fill valve | Hissing, tank overfills or refills slowly | Replace fill valve | Moderate |
| Flush valve and seat | Flapper will not seal even when new | Replace flush valve or resurface seat | Moderate to hard |
| Handle and chain | Weak flush, handle loose | Adjust or replace | Easy |
Replacing a flapper step by step
Shut off
Close the supply valve behind the toilet and flush to drain the tank.
Remove
Unhook the chain and lift the old flapper off its pegs.
Match
Take the old one to the store. Flappers come in several sizes and styles.
Install
Seat the new flapper, set the chain with a little slack and test.
A new flapper costs little and takes a few minutes. If the toilet still runs, the flush valve seat may be worn.
Fill valves and float problems
A fill valve is the tall assembly that refills the tank. Mineral buildup can jam it, and rubber seals harden over time. Replacing it is a standard repair, and many are universal.
Set the water level an inch below the overflow tube. A tank that fills above the tube will drain into the bowl and waste water. If you notice a rising water bill, run the dye test in the next section before you buy parts.
The dye test for silent leaks
Drop a few drops of food coloring into the tank without flushing. Wait fifteen minutes. If color appears in the bowl, the flapper or seat is leaking.
A silent leak can waste a lot of water over a month without a sound. In a house with a high bill and no visible leak, check toilets first before paying for leak detection.
The North Olmsted angle
With a median build year of 1966 in the Census survey profile, many North Olmsted toilets are second or third replacements and some tanks are original. Old tanks can have corroded bolts and tank-to-bowl gaskets that fail together with the flapper. If you are replacing parts in a tank that old, check the bolts and gasket at the same time. Mineral buildup from moderately hard water, reported by Cleveland Water as 105 to 130 ppm, can also jam fill valves.
When to call a plumber
- Water leaks from the base of the toilet, which points to the wax ring or flange.
- The tank cracks or leaks from the shell.
- You replaced the flapper and fill valve and it still runs.
- The bowl clogs often, which may be a drain issue, not a tank issue.
- The shutoff valve will not close or leaks.
If more than one drain is slow, the problem may be in the main line, covered by our drain cleaning page. For a toilet that overflows or leaks at 2 a.m., our toilet repair crew answers 24/7.
Tools and parts to keep at home
A small kit saves a trip. Keep a spare flapper, a universal fill valve, a pair of adjustable pliers and a bucket. A set of replacement tank bolts and rubber washers is cheap and handy.
Photograph the inside of your tank before you start. It helps when you shop for parts and when you reassemble. If your home is in Westlake or Fairview Park, our crews can also handle toilet swaps on the same visit.
Reading the sounds your toilet makes
A hiss after the flush means the fill valve is still passing water, either because the float is set too high or because the seal inside the valve is worn. A trickle that starts every few minutes and stops again points to a flapper that leaks slowly into the bowl.
A long groan or whistle while the tank fills is often a failing fill valve or high supply pressure. A gurgle in the bowl when you run another drain points away from the tank and toward the drain line.
A ten minute checklist
- Remove the lid and set it somewhere safe.
- Look at the water line and compare it to the overflow tube. It should sit about an inch below the top.
- Press the flapper down gently. If the running stops, the flapper or chain is the cause.
- Check that the chain has a little slack and does not catch under the flapper.
- Test the fill valve by lifting the float. If the water stops, the float or its setting is the issue.
- Run the dye test for ten to fifteen minutes before you buy parts.
If you finish the checklist and still cannot find the cause, a plumber can usually tell in a few minutes. Do not keep replacing parts at random, since each wrong part adds cost and delay.
Saving water and money with a tuned tank
A toilet that works correctly uses far less water than one that leaks silently. Fixing a small flapper leak can lower a water bill noticeably, and the part is among the cheapest in the house.
Check the tank water level every year and the flapper every couple of years. Avoid drop-in cleaning tablets, because they attack rubber parts and shorten their life.
If you replace the whole fill valve and flapper at once, you reset the clock on the most failure-prone parts. A matched set is a small price for peace in the bathroom, and it takes less than an hour with basic tools.
Questions homeowners ask
A slow flapper leak lets water seep into the bowl until the fill valve tops up the tank. Replace the flapper first.
Flappers, handles and fill valves are common DIY repairs. Wax rings, flanges and cracked tanks are better left to a plumber.
Often several years, less in hard water or with in-tank tablets that damage rubber.
Low tank water, a flapper that closes early, clogged rim holes or a partial clog can all cause it.
Houses from the 1960s often have older tanks and corroded bolts. Check tank bolts and gaskets when you replace internal parts.
Have a question that is not here? Call (440) 468-0237.